Pages

Monday, August 12, 2024

Ranch & Bacon Pasta Salad

https://encrypted-tbn0.gstatic.com/images?q=tbn:ANd9GcTsRv5lJiFZuLT0lO1AybvvS1BmAS2CcOt-ug&s

I've loved Betty Crocker's Suddenly Salad: Ranch with Bacon for a long time, but I sometimes can't find it on the shelves, and when I do it seems pretty expensive!  Also, I really don't care for the dehydrated/reconstituted peas.  I started removing them (tedious!) and adding my own.  I also prefer real bacon to the "fakeo bacos." In the end I decided that I could probably make this myself and eliminate all the cons while enjoying all the flavorful pros. 

I weighed out the ingredients. I researched, tried, and tweaked several online copycat recipes. And I finally settled on what suits me.  Sorry, Betty!

INGREDIENTS:

2 cups tiny pasta shells
1 Tbs. carrots, julienne cut (2-3 baby carrots)
½ cup fresh or frozen peas (no need to cook or thaw them)
¼ cup REAL bacon bits (I use Kirkland Bacon Crumbles)
1 cup mayonnaise (if you use Miracle Whip, please don't tell me!)
½ tsp. granulated onion (or powder)
2 Tbs. ranch dressing seasoning powder (or ½ package)

DIRECTIONS:

• Boil carrots along with pasta according to package directions. (12 minutes or until tender)
• Drain pasta, rinse with cold water, drain well.
• Stir together seasoning and mayonnaise in medium bowl
• Add peas and bacon bits.
• Stir in pasta and carrots.  Refrigerate leftovers.   

(Hint: Add a bit of milk to refresh leftovers if too dry.)

One fun thing about pasta salad recipes is that you can adjust it to your own particular taste and add-in whatever veggies, cheese, meats you'd like.  Feel free.  Go crazy!


Thursday, March 1, 2018

Orange Julius


Orange Julius                                                      

6 oz. orange juice concentrate
1 cup milk
1 cup water
1 tsp. vanilla
¼ cup sugar
15-20 ice cubes
 
Place all ingredients in a blender.  Cover and whirl until well blended.  Enjoy!

Wednesday, February 7, 2018

Chocolate Peanut Butter No-Bake Cookies

Into a saucepan put: 

½ c. butter (one stick)
2 c. white sugar
¼ c. cocoa
¼ c. light corn syrup
½ c. milk


Bring to a ROLLING boil and boil 60-90 seconds*.  Remove from heat and add:

1 tsp. vanilla
¾ c. chunky peanut butter
3 c. old-fashioned rolled oats


Mix well. Drop by spoonfuls (or medium scoop) onto wax paper-lined** cookie sheets.  Refrigerate until firm.

NOTES:

*Most recipes like this call for boiling for one minute, but it always turns out too soft for me.  I boil it longer and it's still pretty flexible after it cools.

**Instead of wax-paper, I now use reusable silicone baking mats.  It doesn't peel off from the cookie quite as easily, but it's reusable and I just use an inverted spatula to release the cookie.


Using a scoop to portion these cookies has revolutionized my life.  I use a scoop to do other cookies, but I hadn't thought of it for these until a friend suggested it.  Oh my goodness.  So fast.  So clean.  So perfect!  I  love it!  


Monday, November 20, 2017

Chicken Tortilla Soup


6 c. water/chicken broth
3 tsp. (+/-) chicken bouillon*
1 tsp. minced garlic
½ tsp. ground cumin
1 tsp. chili powder
1 ½ c. chopped onion
1 ½ c. frozen corn
12 to 15 oz. can beans, rinsed & drained
1 c. cooked rice
1 ½ c. chunky salsa
1 small zucchini, small dice
1 Tbs. lime juice
1 quart canned chicken thighs, drained**
tortilla chips
 -Monterey jack cheese
 -sour cream
 -chopped green onion
 -avocado

In a large pot over medium heat, bring to boiling the water/broth (use liquid from canned chicken), bouillon (if used), garlic, cumin, chili powder, onion, corn, beans, rice, salsa, zucchini, and lemon juice.  Reduce head and simmer 20-30 minutes.  Gently stir in chicken and heat 5 minutes.  Break up some tortilla chips into individual bowls and pour soup over chips.  Garnish with Monterey jack cheese, sour cream, green onion, and avocado.

*If you don't have enough chicken broth and you need to use water, then add as much bouillon as you need to get the flavor right. 

**Don't forget to use the drained liquid from your chicken as part of your broth.  Waste not, want not!

Serves 6-10 depending on the size of your people. :)


Saturday, January 30, 2016

Sour Cream Lemon Pie


1 C. sugar
3 oz. cream cheese
3 egg yolks, slightly beaten
1 lemon, juiced, and zested
 ~1/2 c. lemon juice, use bottled juice if needed
 ~1 Tbs. lemon zest
1 C. milk
4 Tbs. cornstarch
1/4 C. butter
1 c. sour cream
whipped cream
                                                   
Using a hand mixer process cream cheese and sugar until smooth before adding anything else; then add in eggs and process until homogenized. Add lemon juice, lemon zest, milk, and cornstarch.  Place in heavy saucepan; cook over medium heat until thick.  Stir in butter and cool mixture to room temperature. Stir in sour cream and transfer filling into baked 9-inch pie shell.  Cover with whipped cream.  Store in refrigerator. 

Monday, April 6, 2015

Mini Raspberry Cheesecakes


CRUST:
1 ½ cups finely crushed Oreo cookie crumbs (about 22) (You can also use sugar cookies)
3 Tbsp. butter, melted
  1. Place one row of the cookies into a resealable plastic bag on a flat surface. Pound them with a hammer until crushed into crumbs. It is easier to crush the cookies when there is a smaller amount in the bag. Measure out one and a half cups.
  2. Mix the cookie crumbs and butter in a bowl with a spoon until they're properly mixed and have a consistent texture.
(ALTERNATIVE: I used my food processor and just pulsed it until the crumbs were fine and then added the melted butter and pulsed it until it was incorporated, scraping the sides a couple of times)
  1. Use your fingers to press 1 tablespoon of crumbs into each of the lined muffin tins (I used silicone liners. I recommend it.)
Makes 18-24 depending on the size of your liners.  (I used silicone which narrowed the space enough that it made 24 instead of the originally stated 18.)
HEAT oven to 300°F.
FILLING:
2 packages (8 oz. each) cream cheese, softened
2/3 cup sugar
3 eggs
1 tsp. vanilla
  1. In large bowl, beat cream cheese and sugar with electric mixer on medium speed, scraping bowl frequently, until smooth and creamy. Add eggs, one at a time, beating until smooth after each addition. (NOTE: Do not whip at high speed or mix too long. Introducing too much air will cause cakes to fall after baking.) Stir in vanilla. Pour about 1/4 cup of the filling on top of each of the cookie crusts.
  2. Bake 20 to 22 minutes or until edges are set and centers are still slightly jiggly. Turn oven off, and open door slightly. Cool cheesecake in oven 30 minutes. Remove from oven to cooling rack; cool at room temperature 30 minutes. Refrigerate about 2 hours or until cheesecakes are chilled. If desired, carefully peel off liners. Top with raspberry sauce and sweetened whipped cream.
TOPPING*:
1/3 cup raspberry preserves (or jam)
1 cup fresh or frozen raspberries
1 Tbs. lemon juice
1 Tbs. cornstarch (dissolved in the lemon juice)
In a small saucepan, heat preserves over medium heat till melted. Add raspberries and lemon juice/cornstarch. Cook and stir until slightly thickened (about 1 minute for fresh fruit or 3-4 minutes for frozen fruit). Transfer to a small bowl. Cover; quick-chill in the freezer for 10 minutes or chill in the refrigerator for 20 minutes. Spoon raspberry sauce over cheesecake.


(*DISCLAIMER:  I kind of made up this topping recipe as I went along based on a couple of other recipes I consulted. I was also making 72 cheesecakes at the time and I waaaaay overdid the amount of topping I made.  Soooo, I’ve backed way off on the amounts and I’m hoping that it’s actually enough for one batch of 24 cheesecakes.  You might have leftovers; you might have to make a bit more.  You’ve been warned!)


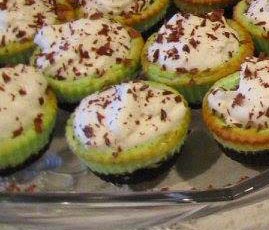
Mini Grasshopper Cheesecakes


I forgot to take my own picture so this is a small
clipping of a picture someone else took of my
cheesecakes. Thus, the low resolution!
CRUST:
1 ½ cups finely crushed Oreo cookie crumbs (about 22) (You can also use sugar cookies)
3 Tbsp. butter, melted
  1. Place one row of the cookies into a resealable plastic bag on a flat surface. Pound them with a hammer until crushed into crumbs. It is easier to crush the cookies when there is a smaller amount in the bag. Measure out one and a half cups.
  2. Mix the cookie crumbs and butter in a bowl with a spoon until they're properly mixed and have a consistent texture.
(ALTERNATIVE: I used my food processor and just pulsed it until the crumbs were fine and then added the melted butter and pulsed it until it was incorporated, scraping the sides a couple of times)
  1. Use your fingers to press 1 tablespoon of crumbs into each of the lined muffin tins (I used silicone liners. I recommend it.)
Makes 18-24 depending on the size of your liners.  (I used silicone which narrowed the space enough that it made 24 instead of the originally stated 18.)
HEAT oven to 300°F.

FILLING:
2 packages (8 oz. each) cream cheese, softened
2/3 cup sugar
3 eggs
1 tsp. peppermint extract
4-6 drops green food coloring
  1. In large bowl, beat cream cheese and sugar with electric mixer on medium speed, scraping bowl frequently, until smooth and creamy. Add eggs, one at a time, beating until smooth after each addition. (NOTE: Do not whip at high speed or mix too long. Introducing too much air will cause cakes to fall after baking.) Stir in flavoring and color. Pour about 1/4 cup of the filling on top of each of the cookie crusts.
  2. Bake 20 to 22 minutes or until edges are set and centers are still slightly jiggly. Turn oven off, and open door slightly. Cool cheesecake in oven 30 minutes. Remove from oven to cooling rack; cool at room temperature 30 minutes. Refrigerate about 2 hours or until cheesecakes are chilled. If desired, carefully peel off liners. Top with sweetened whipped cream and chocolate shavings.